Circular Tubular Cast-on Method June 17, 2015 04:31
This technique is used to create a smooth edge at the cast-on. It has a little elasticity and feels nice against the skin. Choose this cast-on method when the stitch pattern just after the cast-on will be k1, p1 ribbing.
 1. With a contrasting color waste yarn of the same weight as your working yarn, use your desired method to cast on half of the total stitches you need cast on for your project. Place a marker (if desired) and join to work in the round, being careful not to twist the stitches.
Knit 2 rounds in the waste yarn.
Change to working yarn and knit 4 rounds.
 2. Knit the first stitch.
 3. Bring your left needle forward so you can see the WS of the work. Identify the lowest loop in the working yarn, just after the tail.
 4. Insert the left needle into that stitch.
 5. Purl into the picked-up working yarn loop.
 6. *Knit the next stitch, then use the left needle to pick up the next loop of working yarn on the WS and purl into it; repeat from * all the way around.
 7. There should be the same number of loops as there are stitches on the needle. The image shown above is 2 repeats away from the end of the round. (Images 7, 8 and 9 detail the end of the round, per request of a test knitter.)
 8. This image shows one stitch remaining on the left needle and the last working-yarn loop. Knit 1 stitch.
 9. Then insert the left needle into the last working-yarn loop and purl it.

 1. With a contrasting color waste yarn of the same weight as your working yarn, use your desired method to cast on half of the total stitches you need cast on for your project. Place a marker (if desired) and join to work in the round, being careful not to twist the stitches.
 Knit 2 rounds in the waste yarn.
Change to working yarn and knit 4 rounds.
 2. Knit the first stitch.
 3. Bring your left needle forward so you can see the WS of the work. Identify the lowest loop in the working yarn, just after the tail.
 4. Insert the left needle into that stitch.
 5. Purl into the picked-up working yarn loop.
 6. *Knit the next stitch, then use the left needle to pick up the next loop of working yarn on the WS and purl into it; repeat from * all the way around.
 7. There should be the same number of loops as there are stitches on the needle. The image shown above is 2 repeats away from the end of the round. (Images 7, 8 and 9 detail the end of the round, per request of a test knitter.)
 8. This image shows one stitch remaining on the left needle and the last working-yarn loop. Knit 1 stitch.
 9. Then insert the left needle into the last working-yarn loop and purl it.
10. The number of stitches on your needle should now be double what you started with, and the desired total number for your project.

11. As viewed from the WS.
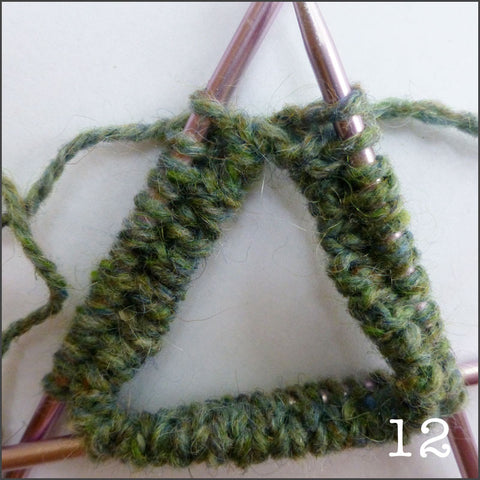
12. Remove the waste yarn.
Your project is ready to begin working the k1, p1 ribbing, beginning with a knit stitch.
Your project is ready to begin working the k1, p1 ribbing, beginning with a knit stitch.


 Nothing will be posted on your behalf.
