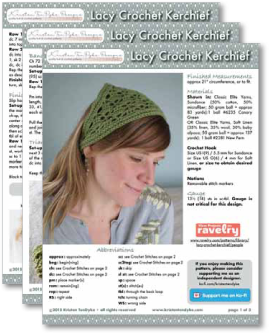
Lacy Crochet Kerchief - Free Pattern March 9, 2022 17:31

This versatile pattern may be used with nearly any yarn. You can stick with the gauge and numbers that are given, or put your math-hat on and crunch a few numbers to the formulas given to use any yarn at any gauge. The band is worked in rows, to fit around the head, then the lace for the triangle is centered on the band and worked outward. Then the final rows are worked over the band and the lacy triangle. There's a simple seam, then it's done!
Check out the pattern on Ravelry.

Purchase the Ad-Free PDF from Ravelry.
Finished Measurements:
approx 21" circumference, or to fit.
Materials
Shown in: Classic Elite Yarns, Sundance (50% cotton, 50% microfiber; 50 gram ball = approx 83 yards):1 ball #6235 Canary Green
OR Classic Elite Yarns, Soft Linen (35% linen, 35% wool, 30% baby alpaca; 50 gram ball = approx 137 yards): 1 ball #2281 New Fern
Crochet Hook
Size US I(9) / 5.5 mm for Sundance or Size US G(6) / 4 mm for Soft Linen, or size to obtain desired gauge
Notions
Removable stitch markers
Gauge
131⁄2 (18) sts in sc-tbl. Gauge is not critical for this design.
Notes
1. Instructions are shown for the Sundance gauge with the Soft Linen gauge in ( ). There are also alternate instruction to make this piece to fit any size with any gauge.
2. Divide your ball of yarn into 2 balls, or use a center pull ball and begin with the end on the outside of the ball.

Pattern
Band
Ch 72 (96) or until length fits comfortably around head, working an even number of chs.
Set-up Row (RS): Sc into second ch from hook, then in each ch across—71 (95) sc (or desired odd number of sc).
Row 1: Ch 1, sc tbl of each sc across.
Rep the last row 2 more times, ending after a WS row.
Pm into the first and last st of the center 41 (57) sts, or approx 4⁄7 of the total length, being sure the center sts are a multiple of 8 sts + 1 (for example: 33, 41, 49, 57 and 65 are all a multiple of 8 sts + 1)—15 (20) sc are on each side of the markers; or the (desired number of sts – center sts) ÷ 2.
Pull the other end of your center-pull ball, or use your second ball of yarn, and join it with a sl st into both, front and back, strands of the first marked st. The yarn rem at beg of row will be worked later, do not cut.
Triangle
Set-up Row (RS): Ch 4 (counts as dc, ch 1), sk 2 sc, dc into each of the next 3 sc, ch 1, *sk 2 sc, [dc, ch 3, dc] into next sc, ch 1, sk 2, dc into each of the next 3 sc, ch 1; rep from * until 2 sts before next marked sc, sk 2, dc into marked sc.
Keep the markers in place.
Row 1 (WS): Ch 4 (counts as dc, ch 1), sk 2 dc, dc into next dc, *ch 1, dc 7 into ch-3 sp, ch 1, sk 2 dc, dc into next dc; rep from * to last dc, dc into top of tch.
Row 2 (RS): Sk, 1 dc, sl st into next dc, ch 4 (counts as dc, ch 1), sk 2 dc, dc into each of the next 3 dc, ch 1, *sk 2 dc, [dc, ch 3, dc] into next dc, ch 1, sk 2 dc, dc into each of the next 3 dc, ch 1; rep from * to last 4 dc, sk 2 dc, dc into next dc, leave tch unworked.
Rep the last 2 rows 3 (5) more times, or until it can no longer be worked as described.
Finishing Row: Ch 4, sk 2 dc, dc into next dc, sk 2 dc, dc into top of tch, turn, sk 1 dc, sl st into next dc. Fasten off, cut yarn.

Purchase the Ad-Free PDF from Ravelry.
Finishing
Slip hook back into live loop at end of band.
Set-up Row (WS): Ch 1, sc tbl of each sc to the marked sc, sc2tog into the marked sc and the ch-4 sp, replace marker into sc2tog, sc 2 into same ch-sp, then sc 3 in each sp along side edge to top of triangle, sc3 into top, center dc of triangle, pm in the center sc of these 3, then sc 3 in each sp along other side edge of triangle to last sp before marker, sc 2 into last sp, then sc2tog in the same sp and the marked st, replace marker in sc2tog, sc tbl of each sc to the end of the band—93 (127) sc.
Row 1 (RS): Ch 1, sc tbl of each sc to marked st, sc2tog tbl of marked st and next sc, replace marker into sc2tog, sc tbl of each sc to next marked st, work 3 sc tbl of marked sc, replace marker into center st, sc tbl of each sc to 1 sc before marked st, sc2tog tbl of next sc and marked sc, replace marker into sc2tog, sc tbl of each sc to end of band. Rep the last row 2 more times. Fasten off.
Block to measurements. Seam the side edges of the band together.
Did you enjoy making this? Please leave a review, here.
Crochet Stitches
ch(s): (chain[s]) *Wrap the yarn around the crochet hook (yarn over) and draw it through the loop on the hook to form the first chain; rep from * as many times as instructed. (The loop on the hook is never included when counting the number of chains).
dc: (double crochet) Yarn over hook, insert hook into indicated st, yarn over and pull up a loop; [yarn over and draw through 2 loops on hook] 2 times.
sc: (single crochet) Insert crochet hook in indicated stitch, yarn over and pull up a loop; yarn over and draw through both loops on hook.
sc tbl: (single crochet through the back loop) Insert crochet hook into the back loop of indicated stitch, yarn over and pull up a loop; yarn over and draw through both loops on hook.
sl st: (slip stitch) Insert crochet hook in the indicated stitch, yarn over and draw through both the stitch and the loop on the hook.
sc2tog: (single crochet 2 together) [Insert crochet hook into next st, yarn over and pull up a loop] 2 times, yarn over and draw through all 3 loops on hook.
Abbreviations
approx: approximately
beg: begin(ning)
ch: see Crochet Stitches above
dc: see Crochet Stitches above
pm: place marker(s)
rem: remain(ing)
rep: repeat
RS: right side
sc: see Crochet Stitches above
sc2tog: see Crochet Stitches above
sk: skip
sl st: see Crochet Stitches above
sp: space
st(s): stitch(es)
tbl: through the back loop
tch: turning chain
WS: wrong side


 Nothing will be posted on your behalf.
