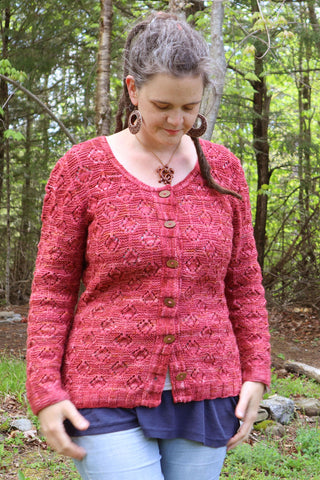
Sati Cardigan Construction Class February 27, 2020 08:52
 Sometimes a sweater may appear so simple and basic once it's completed, but the process of making it can be quite an interesting experience. I feel like the Sati Cardigan is one of those sweaters.
It’s worked in Stockinette stitch all-over, so it’s easier to focus on the construction techniques without the added complexity of stitch patterns. This makes it a perfect pattern to highlight some beautiful hand-dyed, self striping or variegated yarn. Or, it’s a classic all-purpose sweater in a solid color.
Here is how it's made:
Sleeves:
The sleeves are made first, beginning with a provisional cast-on for the underside of the hemmed cuff. The hem is worked in Stockinette stitch with a purled ridge for the "turning round", where the hem is folded. Then the live stitches are joined to the stitches from the provisional cast-on to join the hem.
Both long and short-sleeve instructions are included in this pattern, so you can make a sweater for any season!
The sleeves are worked in the round on double-pointed needles, or using the magic loop method—whichever you prefer. At the underarm, a few stitches are placed onto a small holder for the underarm and the remaining stitches are held separately to join the body for the yoke.
Hem and Pockets:
The hem begins in a similar manner to the sleeves, with a provisional cast-on and a turning row, but it's worked in rows instead of in the round. Before joining the live stitches to the provisional cast-on stitches the pockets are shaped using short rows.
Like this:

The stitches for the right pocket are worked first. Longer short-rows are worked at the beginning, then they gradually get shorter until just a handful of stitches are worked.

Then a few rows of garter stitch are worked along the pocket opening edge, then those stitches are bound off, leaving a few live stitches at the top of the pocket, and the unused body and left pocket stitches still at the top of the hem. The right pocket stitches are placed onto a stitch holder while the left pocket is created.

The left pocket is worked in the same manner as the right pocket: Longer short-rows first, reducing to shorter short-rows at the top of the pocket, then some garter stitch and binding off for the pocket opening trim.

Now the remaining live stitches can be joined to the provisional cast-on stitches. With the WS of the work facing, some of the provisional cast-on stitches are worked without joining to any live stitches, then the center provisional cast-on stitches are joined to the live stitches between the pockets and the remaining provisional cast-on stitches are worked to the end.
The tops of the pockets aren't joined yet. But with the hem sealed, you can see them starting to take shape.

Body:
The back and fronts are worked as one piece—with waist shaping—from the hem to the underarms. The held stitches from the tops of the pockets are joined to the body once the body measures the same length as the pockets.
The center front edges of the pockets are still open until the body is finished.
At the underarm, some stitches are placed on holders for the underarms, then the sleeve stitches are added to the body and the yoke.

Yoke:
The fronts, sleeves and back are worked simultaneously with markers placed to indicate where to decrease for shaping the armholes and sleeve caps.

All the armhole stitches are decreased from the fronts and back first.

Then stitches are decreased at each edge of the sleeves to shape the caps. At some point, neck shaping is started and worked at the same time as the cap shaping.

Tops of Sleeve Caps:
When the armholes are just a few inches shy of their full length, the cap shaping changes to short-rows to decrease the 6 of the remaining 8 sleeve stitches.
These short-rows are worked over the body stitches to lengthen the armhole depth without adding any additional length to the sleeve cap. This is how they're worked:

Right Sleeve:

Short-Rows are worked over the Right Front stitches, while decreasing stitches from the right edge of the right sleeve (above).

Some short-rows are worked at the upper right back, to shape the back neck, and decrease stitches from the left edge of the Right Sleeve.
Left Sleeve:

Short-Rows are worked at the upper left back, shaping the left side of the back neck and decrease stitches from the right edge of the Left Sleeve.

The last few stitches on the left sleeve are decreased as short-rows are worked on the left front stitches.
Sign up to be notified of all new patterns.
Shoulders:
There are now 2 stitches remaining on each sleeve, which are now considered part of the front and back (1 st for each). The back neck stitches are bound off. On each side of the bound-off back neck stitches there are the back and front shoulder stitches. They're folded in the center and joined using the three-needle bind-off technique.

At this point the body is completed, but the center front of the pockets are still open and need to be closed up.
Button Bands:
When picking up stitches for the button bands, the needle pulls up yarn through both the body and pocket layers. This joins the body to the pocket at the center front, completing the pockets.

The bands are worked similarly to the hem, with 2 layers of stockinette stitch, folded. Buttonholes are worked on both layers of the button bands. Then a whipstitch is worked around both layers of the opening, to seal it together.
The live stitches from the button band are joined to the body by picking up a stitch near the original pick-up row of the band, and binding off as you go along.
Finishing Touches:
The held underarm stitches are joined together using the three needle bind off. And the neckband stitches are picked up and bound off for a dainty neckline trim.
Discussion:
If you like this sort of post, and would like me to make more of these, describing some of my other interesting and uniquely constructed patterns, let me know in the comments below!


 Nothing will be posted on your behalf.
